15 OT-Approved Exercises to Improve Fine Motor Skills – Finger Isolation Activities for Kids
By Wellness Hub
Last Updated: September 2, 2025
Have you noticed your child struggling to hold a pencil, type on a tablet, or fasten a button? These everyday tasks all rely on one essential fine motor skill—finger isolation. Finger isolation is the ability to move one finger at a time while keeping the others still. It’s a building block for handwriting, typing, dressing, and countless daily activities that help children grow independent.
The good news? Strengthening this skill doesn’t require fancy equipment or hours of practice. With just a few minutes a day and simple, play-based exercises, parents and caregivers can help children build stronger, more coordinated fingers—right at home. Backed by occupational therapists, these fun activities are designed to boost fine motor control, pre-writing readiness, and everyday confidence.
At Wellness Hub, we’ve created a complete guide with 15 therapist-approved finger isolation activities that you can start today. Let’s dive into how these small movements can lead to big developmental gains.
Help Your Child Grow Strong
Build your child’s motor, sensory, and daily living skills with expert occupational therapy—online, flexible, and empowering.
Benefits of Finger Isolation Activities for Kids
1. Supports Handwriting and Pre-Writing Readiness
Strong finger isolation helps children hold a pencil correctly, form letters with better control, and improve overall handwriting. These small movements prepare their hands for tracing, coloring, and eventually writing full sentences. Practicing finger isolation early reduces frustration with pencil grip and builds the foundation for smoother pre-writing skills.
2. Builds Typing, Dressing, and Self-Care Independence
Finger isolation goes beyond the classroom. Kids who can move each finger independently find it easier to use keyboards, manage buttons and zippers, and feed themselves with utensils. These everyday skills give them more independence at school and at home, helping them feel capable in daily routines.
3. Boosts Fine Motor Confidence and School Readiness
As children master finger isolation, they gain confidence in their abilities. Tasks that once felt difficult—like typing, fastening clothing, or cutting with scissors—become easier. This confidence supports smoother school participation, better focus in class, and readiness for new challenges, both academic and practical.
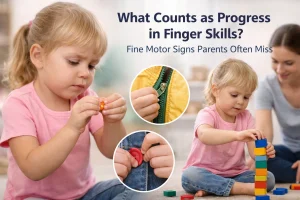
How to Do Finger Isolation Activities at Home
You don’t need a clinic or fancy equipment to help your child strengthen their fingers. Finger isolation activities can be easily built into your daily routine with just a few minutes of focused play.
- Start small—just 5 to 7 minutes a day. Short, frequent practice works better than long sessions. This keeps your child engaged without feeling overwhelmed.
- Make it playful. Use everyday items like buttons, switches, playdough, or even a phone screen to create fun games. When children see these activities as play, they are more motivated to keep going.
- No special tools required. Most activities can be done with what you already have at home—pencils, paper, toys, or even your own hands.
- Consistency is more important than perfection. Don’t worry if your child struggles at first. With regular practice, small improvements add up. A few minutes daily can lead to stronger fingers, better pencil control, and more independence in everyday tasks.
Tip: Try adding finger games as a warm-up before homework, writing, or playtime.
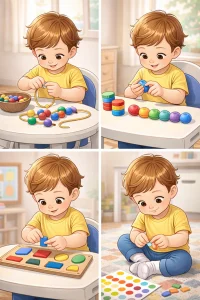
How to Do Finger Isolation Activities at Home
Finger Isolation Activities approved by OT
Supporting your child’s finger isolation doesn’t require expensive tools or long sessions. Just 5–7 minutes a day of focused play can make a noticeable difference in their fine motor skills. Choose 2–3 activities at a time, keep the sessions fun, and encourage your child with praise rather than perfection.
- Make it playful: Use songs, stories, or games to keep your child engaged.
- Use what you have: Everyday objects like coins, switches, buttons, or salt trays work well.
- Adjust for comfort: For children with sensory needs, start with softer textures or easier motions before progressing.
- Stay consistent: Repetition builds strength and control, so add these activities into daily routines like homework warm-ups or bedtime play.
| Activity | Materials | Steps | Easier Variation | Try Next | Sensory Tip | Real-Life Link |
|---|---|---|---|---|---|---|
| 1. Finger Tapping Games | Just hands | Touch thumb to each finger one by one | Start with 2 fingers only | Tap both hands at once | Use stickers or puppets | Builds pencil grip and typing control |
| 2. Pointing and Pressing Buttons | Toy buttons, remotes, tablet | Point to objects and press buttons using index finger | Use large, colorful targets | Press with middle, ring, or pinky | Try soft buttons or flat surfaces | Supports tablet use and communication |
| 3. Finger Puppets / Character Play | Finger puppets | Move one puppet at a time while others stay still | Start with 1 puppet only | Switch fingers quickly or act out stories | Use soft fabric puppets | Strengthens writing and typing readiness |
| 4. Piano or Keyboard Play | Piano, toy keyboard, or app | Press keys one finger at a time | Use color-coded toy keys | Play simple tunes or two-hand play | Use soft-touch keyboards | Improves rhythm and hand–eye coordination |
| 5. iPad Tapping Games | Tablet with tap-based apps | Tap shapes or bubbles with index finger only | Use larger targets | Assign colors to different fingers | Use stylus or glove | Transfers to touchscreen and remote control use |
| 6. Sign Language Fingerspelling | Fingerspelling chart | Form simple letters like A, B, E with fingers | Practice one letter per day | Spell names or play flashcard games | Try “air signs” or gloves | Builds control for writing and typing |
| 7. Sand or Salt Tray Drawing | Tray + salt/sand | Trace lines or letters with one finger | Start with big shapes | Use different fingers or timed challenges | Use flour or fabric if textures are difficult | Prepares for letter writing and scissor use |
| 8. Push Buttons into Playdough | Playdough + small buttons | Press buttons into dough one finger at a time | Use larger buttons and soft dough | Create finger press patterns | Try smooth clay or gloves | Strengthens grip for tool use |
| 9. Finger Lifts on Tabletop | Table surface | Lift one finger at a time while palm stays flat | Begin with 2 fingers only | Random lifts or two-finger lifts | Use soft mats or gloves | Improves typing and instrument skills |
| 10. Finger Mazes or Tracking Lines | Printed maze sheets | Trace paths with one finger | Use wide, high-contrast lines | Trace with different fingers or blindfolded | Try raised paths with glue or yarn | Supports handwriting control |
| 11. Typing or Keyboard Drills | Keyboard or typing app | Press letters one finger at a time | Use large on-screen keyboards | Add color-coded finger zones | Use soft-touch keyboards | Builds classroom typing skills |
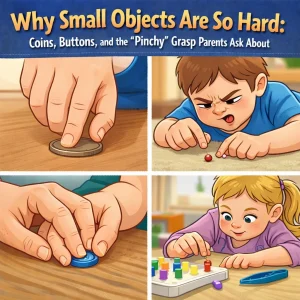
| 12. Coin or Marble Push | Coins or marbles | Push using one finger across table | Use larger objects | Play timed races or pinky pushes | Use soft buttons or foam discs | Improves writing pressure and fine motor speed |
| 13. Light Switch Practice | Real or toy switches | Flip switches with one finger at a time | Use toy switches with low resistance | Speed rounds or finger-switching patterns | Try foam or Velcro flaps | Builds control for daily appliances |
| 14. “Which Finger?” Game | Parent’s hand | Tap child’s finger and ask them to move or name it | Allow visual cues | Play blindfolded or random taps | Use soft brushes or puppet taps | Improves body awareness and pencil grip |
| 15. One-Finger Painting | Washable paints + paper | Paint shapes using one finger at a time | Use one color only | Assign colors to different fingers | Use sponge or paint under cling film | Combines art with motor skill development |
Occupational Therapy Tips for Finger Isolation Success
Helping your child build finger isolation skills doesn’t have to feel like a therapy session—it can be short, fun, and rewarding. Occupational therapists recommend the following tips to make every practice count:
1. Keep Sessions Short and Engaging
Children learn best in small bursts. Aim for 5–7 minutes a day, choosing 2–3 activities that your child enjoys. Short sessions keep their attention focused and prevent frustration. A quick round before schoolwork, playtime, or bedtime routines is enough to build steady progress.
2. Introduce Sensory-Friendly Adjustments
Every child has different comfort levels. Some may love textures like playdough, while others may avoid them. Try sensory-friendly variations—using soft materials, gloves, or visual cues—to make activities easier and more enjoyable. Adjusting the experience ensures your child practices finger isolation without stress.
3. Use Songs, Routines, and Playful Themes
Turn practice into play. Add songs, stories, or themed games to each activity so your child stays motivated. For example, finger tapping can become a “piano concert,” while puppet play can be part of a story adventure. Consistent routines make these exercises feel like a fun part of daily life, rather than another task.
At Wellness Hub, our therapists encourage parents to focus on consistency over perfection. A few minutes of playful practice each day helps children gain the finger strength and control they need for writing, typing, dressing, and independent living.
Real-Life Benefits of Finger Isolation for Kids
Strong finger isolation doesn’t just stay in therapy—it shows up in everyday skills your child needs to grow with confidence. Here’s how consistent finger isolation activities make a difference:
1. Pencil Grip and Handwriting Ease
Children with better finger control find it easier to hold a pencil correctly, apply the right pressure, and write legibly. Improved isolation of the index and thumb fingers reduces fatigue, making writing tasks smoother and less frustrating. Over time, this lays the foundation for neat handwriting and stronger academic performance.
2. Typing and Digital Learning
In today’s classrooms, typing and tablet use are as important as handwriting. Finger isolation helps kids tap keys with accuracy, use touchscreens without relying on their whole hand, and build proper typing skills. This prepares them for school assignments, digital learning apps, and future computer-based tasks.
3. Dressing Skills (Buttons and Zippers)
Everyday self-care tasks like buttoning shirts, zipping jackets, or fastening snaps depend on small, precise finger movements. Practicing finger isolation strengthens the fine motor muscles needed for these dressing skills, allowing children to get ready independently and feel more capable.
4. Greater Independence in Daily Life
From turning pages in a book to operating light switches or playing with toys, finger isolation supports countless everyday actions. The more control a child has over individual fingers, the more independent and confident they become in navigating school, home, and play routines.
At Wellness Hub, we emphasize these real-life outcomes because they empower parents to see therapy not just as exercises, but as building blocks for independence and success.
Conclusion
Helping your child strengthen their fingers doesn’t require hours of effort or expensive tools. With just a few minutes a day, you can guide them through simple, play-based activities that build real-life skills like handwriting, dressing, and independence.
The key is consistency. Even 2–3 finger isolation activities practiced daily can create steady progress over time—improving control, confidence, and readiness for school tasks.
Start small, keep it fun, and celebrate every little milestone. And remember, Wellness Hub is here to support you with expert resources, printable guides, and therapist-designed tools to make your child’s fine motor journey easier and more enjoyable.
Frequently Asked Questions
1. What are finger isolation activities for kids?
Finger isolation activities are simple exercises that help a child move one finger at a time. They build fine motor control needed for writing, typing, dressing, and everyday independence.
2. Why are finger isolation activities important?
They strengthen small hand muscles, improve coordination, and prepare kids for handwriting, using scissors, buttoning clothes, and typing on keyboards.
3. At what age should children start finger isolation activities?
Most kids can begin basic finger isolation activities around ages 2–3. Activities become more structured between ages 3–6, when handwriting and school skills develop.
4. How do finger isolation activities help with handwriting?
By teaching fingers to move independently, these activities improve pencil grip, letter formation, and writing endurance, making handwriting easier and less tiring.
5. Can finger isolation activities be done at home without special tools?
Yes. Everyday items like playdough, coins, buttons, light switches, or even an iPad can be used for finger isolation activities—no expensive tools are needed.
6. How long should my child practice finger isolation activities daily?
Just 5–7 minutes a day is enough. Consistency matters more than duration, and short playful sessions work best for young children.
7. Do finger isolation activities support digital skills like typing?
Absolutely. Activities such as typing drills and app-based tapping games strengthen finger independence, making it easier for kids to type, swipe, and use digital tools.
8. What if my child struggles with finger isolation activities?
Start with easier variations like using larger buttons, soft playdough, or mirror play. If challenges persist, consult an occupational therapist for guidance.
9. Are finger isolation activities helpful for children with sensory needs?
Yes. Sensory-friendly variations—like using soft textures, finger puppets, or stylus tapping—help children who are sensitive to touch or avoid certain textures.
10. Where can I find structured finger isolation activity guides?
Parents can access printable packs, video demos, and home therapy resources from Wellness Hub, designed by occupational therapists to support children’s fine motor growth.
About the Author
Sonali Sharma, Occupational Therapist
Sonali Sharma is a skilled Occupational Therapist at Wellness Hub, with over three years of experience in supporting children with developmental, behavioral, and learning challenges. She holds a Bachelor’s in Occupational Therapy (BOT) from Amity University and has worked with leading institutions such as NIMHANS Bengaluru and ESIC Hospital Faridabad.
At Wellness Hub, Sonali provides online occupational therapy sessions tailored to each child’s needs. She specializes in pediatric therapy, autism support, sensory integration, and developmental skill-building, helping children strengthen motor skills, improve focus, and become more independent in daily life.
Her therapy style is child-centered, play-based, and evidence-driven—making sessions both effective and enjoyable for kids. Sonali also equips parents with practical home therapy strategies to extend progress beyond sessions.
Passionate about empowering families, Sonali believes in creating a nurturing space where children can thrive while parents feel supported every step of the way.
Book your Free Consultation Today
Parent/Caregiver Info:
Client’s Details:
* Error Message